Chilkat Dev-C++ Static Library
Getting Started
1. Download and Unzip to any Directory
The Chilkat static library for Dev-C++ is lib/libchilkat.a. The headers (.h) files are in the include subdirectory.
2. Open Dev-C++:
Start Dev-C++ and open your project or create a new one.
3. Include the Header Files:
Ensure that the header files for the static library are available and included in your project files where needed. For example:
Here is a the source code for a simple C++ program. Your application must call UnlockBundle once at the start each time it runs. Include the Chilkat header for each Chilkat class used.
// Simple C++ Example

#include "include/CkCrypt2.h"
#include "include/CkGlobal.h"

bool UnlockChilkat(void)
{
	CkGlobal glob;
	return glob.UnlockBundle("Anything for 30-day trial");
}

void DoSomethingWithChilkat(void)
{
    CkCrypt2 crypt;
    crypt.put_CryptAlgorithm("aes");
    crypt.put_CipherMode("cbc");
    crypt.put_KeyLength(256);
    crypt.put_PaddingScheme(0);
    crypt.put_EncodingMode("hex");
    const char *ivHex = "000102030405060708090A0B0C0D0E0F";
    crypt.SetEncodedIV(ivHex,"hex");
    const char *keyHex = "000102030405060708090A0B0C0D0E0F101112131415161718191A1B1C1D1E1F";
    crypt.SetEncodedKey(keyHex,"hex");

    const char *encStr = crypt.encryptStringENC("The quick brown fox jumps over the lazy dog.");
    std::cout << encStr << std::endl;

    const char *decStr = crypt.decryptStringENC(encStr);
    std::cout << decStr << std::endl;

    return;
    }

int main(int argc, const char* argv[])
{
	if (UnlockChilkat()) {
	    DoSomethingWithChilkat();
	}
	return 0;
}
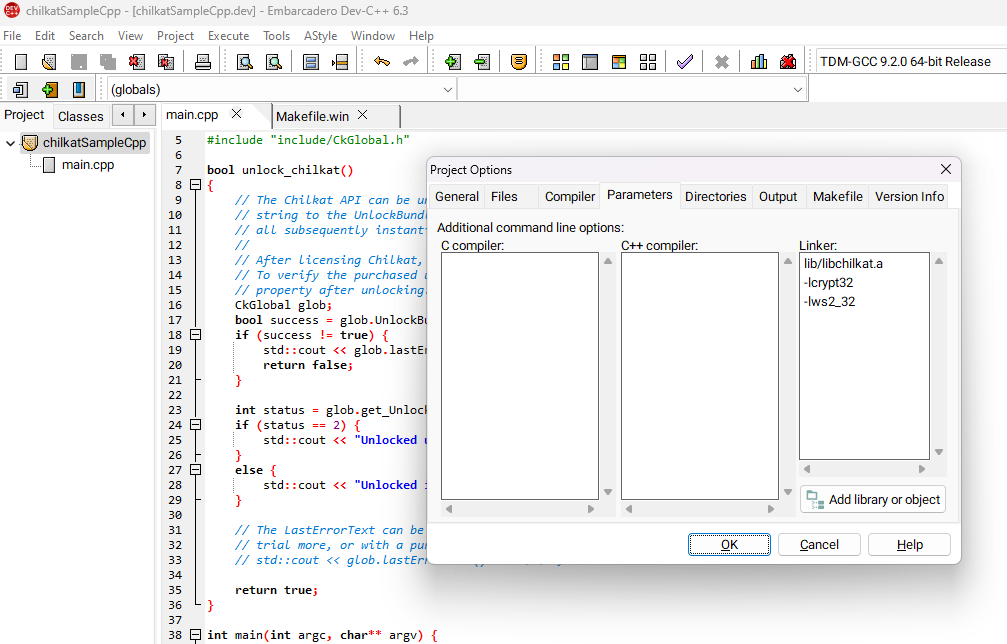
4. Configure the Project to Link the Static Library
Go to Project > Project Options and add the static library by:
- Go to the Parameters tab.
- Under the Linker section, you need to add your static library file. Click the Add Library or Object button (usually denoted by an icon of a library or object file).
- Navigate to the location of the libchilkat.a file, select it, and click Open.
- The library should now appear in the list of libraries to be linked.
- Also add -lcrypt32 and -lws2_32 as shown below.
5. Specify the Library Path (if necessary)
- If your library is not in the default library search path, you need to specify the path to the library directory.
- Go to the Directories tab.
- Under the Library Directories section, click Add, then navigate to and select the directory containing the libchilkat.a file.
6. Build the Project:
Save your project settings and build the project by clicking Execute > Compile & Run or pressing F9.
Release Notes
The release notes are located on the Chilkat blog.
Unicode Support
The Chilkat C++ libraries support Unicode in the form of utf-8 multibyte character strings. For more information see these pages:
- Using Unicode String Literals
- Using ANSI or utf-8 with Chilkat C++ "const char *" arguments.
- C++ Examples for Unicode, utf-8, and ANSI
Misdiagnosed Memory Leaks
C++ programmers often misdiagnose memory leaks with Chilkat. Please read the information here to understand the reason: Misdiagnosed C++ Memory Leaks